How we started with accessibility at GoodRequest

28. Nov 2023Frontend
At GoodRequest, our goal is to create a meaningful and responsible digital world. For this reason, we have long been thinking how to improve testing processes, increase testing efficiency in the case of significant application changes, ensure the functionality of critical application parts, and deliver a robust and reliable software product to our clients.


There are many reasons why developers don't implement end-to-end tests, but it's important to remember that testing is a crucial part of software development. End-to-end tests are usually costly to implement and maintain, and sometimes, writing them to be both reliable and effective can be challenging.
Some of the reasons and causes why developers do not implement E2E tests are:
Despite these reasons, it is important to understand that testing is key to ensuring software quality and minimizing errors. Implementing end-to-end tests can lead to more robust and reliable software products, which should be the goal of every developer.
Within our team, we had our first experience with the Selenium tool, often compared to Cypress. The setup and implementation of some scenarios using Selenium were relatively complicated, so we decided to give Cypress a try. When choosing between Selenium and Cypress, it is important to consider project needs and team skills. Selenium is versatile and scalable, while Cypress is optimized for modern web applications, offering simpler and faster test development. Therefore, we chose Cypress as it better suited our needs.
For more information about Cypress, you can visit their blog. Further details on Cypress architecture and key features can be found in the article: Key differences.
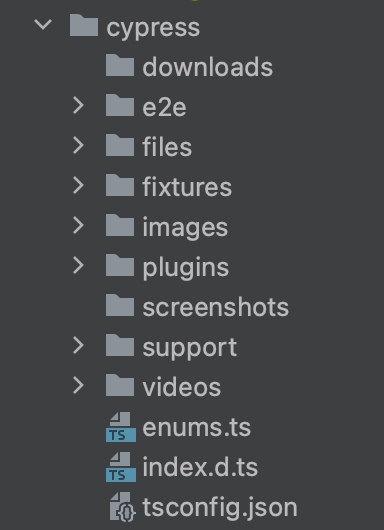
After successfully installing Cypress into the project, the following file structure is created. More information about the structure and individual components can be found in this article: Writing and organizing tests.

Our recommendations for configuring individual options are as follows:
For more information about the basic and other options, you can refer to the article: Configuration.
import { defineConfig } from 'cypress'

export default defineConfig({
  projectId: '<projectID>',
  scrollBehavior: 'center',
  viewportWidth: 1920,
  viewportHeight: 1080,
  retries: 3,
  numTestsKeptInMemory: 10,
  videoCompression: false,
  screenshotOnRunFailure: false,
  e2e: {
    setupNodeEvents: (on, config) => {
		require('cypress-localstorage-commands/plugin')(on, config)
		require('./cypress/plugins/index.ts').default(on, config)
		require('@cypress/code-coverage/task')(on, config)
		on('before:browser:launch', (browser, launchOptions) => {
			// Chrome is used by default for test:CI script
			if (browser.name === 'chrome') {
				launchOptions.args.push('--disable-dev-shm-usage')
			} else if (browser.name === 'electron') {
				launchOptions.args['disable-dev-shm-usage'] = true
			}

			return launchOptions
		})
		return config
    },
	env: {
		auth_email: process.env.AUTH_EMAIL,
		auth_password: process.env.AUTH_PASSWORD,
		sign_in_url: process.env.SIGN_IN_URL
	},
	experimentalRunAllSpecs: true,
	baseUrl: 'http://localhost:3001',
	defaultCommandTimeout: 6000
  },
})
Examples of suite test and time test
More information can be found in the article: Writing tests.
describe('Users crud operations', () => {
    it('Create user', () => {
      ...
    })

		it('Show user', () => {
      ...
    })

    it('Update user', () => {
      ...
    })

		it('Delete user', () => {
      ...
    })
})

// alebo

context('Users crud operations', () => {
    specify('Create user', () => {
      ...
    })

		specify('Show user', () => {
      ...
    })

    specify('Update user', () => {
      ...
    })

		specify('Delete user', () => {
      ...
    })
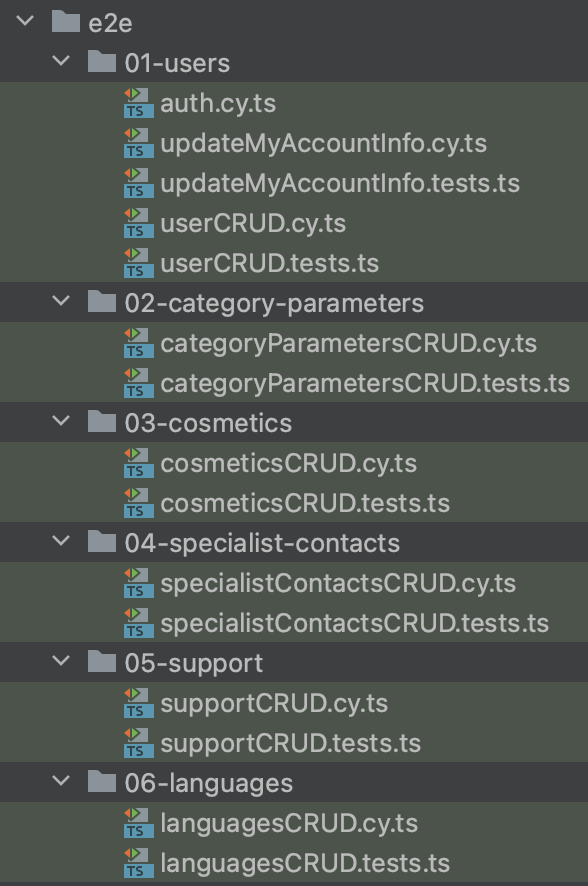
})This naming convention and folder/test hierarchy model has proven effective for larger projects requiring the implementation of a significant number of tests.

Within our team, we use hooks for authorization, token storage, and token retrieval to avoid logging in before each test, as tests are isolated.
before(() => {
	loginViaApi(email, password)
})

beforeEach(() => {
	// restore local storage with tokens and salon id from snapshot
	cy.restoreLocalStorage()
})

afterEach(() => {
	// take snapshot of local storage with new refresh and access token
	cy.saveLocalStorage()
})
Hooks defined in the support folder and the e2e.ts file automatically run before each test suite. You can use this method when logging in.
describe('Hooks', () => {
	it('loginViaApi', () => {
		cy.log(`sign_in_url is ${Cypress.env('sign_in_url')}`)
		cy.log(`auth_email is ${Cypress.env('auth_email')}`)
		cy.log(`auth_password is ${Cypress.env('auth_password')}`)
		cy.apiAuth(Cypress.env('auth_email'), Cypress.env('auth_password'), Cypress.env('sign_in_url'))
	})
})
An example function we use to obtain tokens needed for authorization during test execution.
export const loginViaApi = (user?: string, password?: string) => {
	cy.apiAuth(user || Cypress.env('auth_email'), password || Cypress.env('auth_password'), Cypress.env('sign_in_url'))
}
Hooks can also run commands or functions to prepare data expected during tests. For more information, read the following article: Hooks.
More about excluding and including tests can be found in this article: Excluding and Including tests.
For more information about debugging, refer to the article: Debugging.
Before executing each test, it is essential to have test data stored, for example, in a database. There are many ways to prepare this data before testing.
More information can be found in the article: Testing strategies.
Options for preparing data needed for individual tests.
describe('Users CRUD operations', () => {
  beforeEach(() => {
    // pred každým testom môžete spustiť príkaz, ktorý premaže databázu
		// a vytvorí nové záznamy
    cy.exec('npm run db:reset && npm run db:seed')

    // vytvorenie používateľa
    cy.request('POST', '/user', {
      body: {
				// ... testovacie data
			},
    })
  })

	...
})
For more information see the article: Database initialization & seeding.
An example of intercepting a post request.
{
	...
	cy.intercept('POST', '/user/*', {
		statusCode: 200,
		body: {
			name: 'John Garfield'
		}
	}).as('createUser')
	...
}
For more information, read here.
Example of a correct component identifier.
...
<div className={cx('input-inner-wrapper', { 'to-check-changes': toCheck })}>
				<Input
					{...input}
					id={formFieldID(form, input.name)}
					{/* alebo */}
					data-cy={formFieldID(form, input.name)}
					className={cx('input', { 'input-filter': fieldMode === FIELD_MODE.FILTER })}
					onChange={onChange}
					onBlur={onBlur}
					addonBefore={addonBefore}
					size={size || 'middle'}
					onFocus={onFocus}
					value={input.value}
				/>
</div>
...
Example of a command to set the value for a "pin" component. As you can see below, a unique ID is used to retrieve the element, which in our case consists of a unique form name and a field.
Cypress.Commands.add('setValuesForPinField', (form: string, key: string, value: string) => {
	const elementId: string = form ? `#${form}-${key}` : `#${key}`
	const nthInput = (n: number) => `${elementId} > :nth-child(${n})`
	const pin = [...value]
	pin.forEach((char: string, index) =>
		cy
			.get(nthInput(index + 1))
			.type(char)
			.should('have.value', char)
	)
})Example of how we use “custom commands” to select and set values for individual elements.
Cypress.Commands.add('selectOptionDropdownCustom', (form?: string, key?: string, value?: string, force?: boolean) => {
	const elementId: string = form ? `#${form}-${key}` : `#${key}`
	cy.get(elementId).click({ force })
	if (value) {
		// check for specific value in dropdown
		cy.get('.ant-select-dropdown :not(.ant-select-dropdown-hidden)', { timeout: 10000 })
			.should('be.visible')
			.find('.ant-select-item-option')
			.each((el: any) => {
				if (el.text() === value) {
					cy.wrap(el).click({ force })
				}
			})
	} else {
		// default select first option in list
		cy.get('.ant-select-dropdown :not(.ant-select-dropdown-hidden)', { timeout: 10000 }).should('be.visible').find('.ant-select-item-option').first().click({ force: true })
	}
})

Cypress.Commands.add('clickDropdownItem', (triggerId: string, dropdownItemId?: string, force?: boolean) => {
	cy.get(triggerId).click({ force })
	if (dropdownItemId) {
		// check for specific value in dropdown
		cy.get('.ant-dropdown :not(.ant-dropdown-hidden)', { timeout: 10000 })
			.should('be.visible')
			.find('.ant-dropdown-menu-item')
			.each((el: any) => {
				if (el.has(dropdownItemId)) {
					cy.wrap(el).click({ force })
				}
			})
	} else {
		// default select first item in list
		cy.get('.ant-dropdown :not(.ant-dropdown-hidden)', { timeout: 10000 }).should('be.visible').find('.ant-dropdown-menu-item').first().click({ force: true })
	}
})
More information can be found in the article: Custom commands.
Instead of defining constants and storing the selected element, it is necessary to use so-called aliases.
// DONT DO THIS. IT DOES NOT WORK
// THE WAY YOU THINK IT DOES.
const a = cy.get('a')

cy.visit('https://example.cypress.io')

// nope, fails
a.first().click()

// Instead, do this.
cy.get('a').as('links')
cy.get('@links').first().click()
More information can be found in the article: Variables and aliases.
What if we need to test registration, including email confirmation or activation codes? In such cases, the "task plugin" is useful for loading emails from the mailbox.
In Cypress, it is possible to use the "task plugin" to perform "custom" tasks and modify the testing environment's behavior. These tasks can include various operations, such as accessing files, data manipulation, API calls, setting various variables, and more.
In our case, we use a "task" to load emails and retrieve activation codes. Below is an example of defining a task and its use in a test.
import axios from 'axios'

/**
 * @type {Cypress.PluginConfig}
 */
export default (on: any, config: any) => {
	on('task', {
		getEmail(email: string) {
			return new Promise((resolve, reject) => {
				axios
					.get(`http://localhost:1085/api/emails?to=${email}`)
					.then((response) => {
						if (response) {
							resolve(response.data)
						}
					})
					.catch((err) => {
						reject(err)
					})
			})
		}
	})

	return on
}it('Sign up', () => {
cy.intercept({
method: 'POST',
url: '/api/sign-up'
}).as('registration')
cy.visit('/')
cy.wait('@getConfig').then((interceptionGetConfig: any) => {
// check status code of login request
expect(interceptionGetConfig.response.statusCode).to.equal(200)
cy.clickButton(SIGNUP_BUTTON_ID, FORM.LOGIN)
// check redirect to signup page
cy.location('pathname').should('eq', '/signup')
cy.setInputValue(FORM.REGISTRATION, 'email', userEmail)
cy.setInputValue(FORM.REGISTRATION, 'password', user.create.password)
cy.setInputValue(FORM.REGISTRATION, 'phone', user.create.phone)
cy.clickButton('agreeGDPR', FORM.REGISTRATION, true)
cy.clickButton('marketing', FORM.REGISTRATION, true)
cy.clickButton(SUBMIT_BUTTON_ID, FORM.REGISTRATION)
cy.wait('@registration').then((interceptionRegistration: any) => {
// check status code of registration request
expect(interceptionRegistration.response.statusCode).to.equal(200)
// take local storage snapshot
cy.saveLocalStorage()
})
// check redirect to activation page
cy.location('pathname').should('eq', '/confirmation')
cy.task('getEmail', userEmail).then((email) => {
if (email && email.length > 0) {
const emailHtml = parse(email[0].html)
const htmlTag = emailHtml.querySelector('#confirmation-code')
if (htmlTag) {
cy.log('Confirmation code: ', htmlTag.text)
cy.visit('/confirmation')
cy.intercept({
method: 'POST',
url: '/api/confirmation'
}).as('activation')
cy.setValuesForPinField(FORM.ACTIVATION, 'code', htmlTag.text)
cy.clickButton(SUBMIT_BUTTON_ID, FORM.ACTIVATION)
cy.wait('@activation').then((interception: any) => {
// check status code of registration request
expect(interception.response.statusCode).to.equal(200)
// take local storage snapshot
cy.saveLocalStorage()
})
}
}
})
})
})For more information, read the article: Task.
We use the babel-plugin-istanbul and cypress/instrument-cra for code instrumentation. The cypress/instrument-cra library allows activating instrumented code even in "dev mode" or when running the local dev server.
{
  "scripts": {
		...
    "start": "react-scripts -r @cypress/instrument-cra start",
		...
  }
}
The script we use for an instrumented build of the application for E2E tests.
{
  "scripts": {
		...
		"build:coverage": "cross-env CYPRESS_INSTRUMENT_PRODUCTION=true NODE_ENV=production SKIP_PREFLIGHT_CHECK=true REACT_APP_VERSION=$npm_package_version react-scripts -r @cypress/instrument-cra build",
		...
	}
}
In the package.json file, you can define which files within the codebase will be included in the “code coverage” report.
}
	...
	"nyc": {
	  "include": [
	    "src/pages/*"
	  ],
	  "exclude": [
	    "src/pages/Calendar/**/*"
	  ]
	}
}
The @cypress/code-coverage library is used for integration (processing, updating, and storing) of code coverage results during test execution. More information can be found here.
We recommend choosing a CI provider that can scale hardware resources (e.g., Github Actions and so on…) since executing a large number of tests is a demanding operation.
If scaling hardware resources or migrating to another CI provider is not possible, another option is to run tests gradually. This allows running specific tests for different roles.
{
	/* spustenie konrétneho test suitu */
	"test:CI:auth": "AUTH_EMAIL=admin@test.com  AUTH_PASSWORD=test SIGN_IN_URL=http://localhost:3000/api/login cypress run --spec cypress/e2e/01-users/auth.cy.ts",
	/* spustenie všetkých test suitov, ktoré sa nachádzajú v priečinku "01-users" */
	"test:CI:users": "AUTH_EMAIL=manager@test.com AUTH_PASSWORD=test SIGN_IN_URL=http://localhost:3000/api/login cypress run --spec cypress/e2e/01-users/*.ts",
}...
env: {
auth_email: process.env.AUTH_EMAIL,
auth_password: process.env.AUTH_PASSWORD,
sign_in_url: process.env.SIGN_IN_URL
},
...The integration can be extended with the Cypress cloud option. The main advantage is the ability to parallelize test execution and manage test results.
More information about integration can be found in the article: Running Cypress in continuous integration.
